Operator Safety Precautions
Do Not Allow Anyone To Operate This Equipment Who Has Not Been Properly Trained In Its Safe Operations.
Before installing Spray Equipment onto Tractor or Vehicle the Operator should:
- Be thoroughly familiar with spraying equipment and the operation of this equipment before turning it on.
- Be sure safety shields, guards, chains, and warning labels are in working order and in place.
- Turn off Tractor or vehicle and remove key before servicing equipment.
- Read instructions on chemicals being used and ask your chemical dealer on proper use and safety with such chemicals in your spraying equipment.
- Be sure Booms are in transport position when traveling roads.
- Be sure safety signs are mounted and are visible.
Always Think…The Safe Way Is The Best Way.
Hypro PTO Hook-up
Click here to view information on Hypro PTO Hook-up.
Examples of Similar Parts
Key No. Parts Burroughs Model T1105
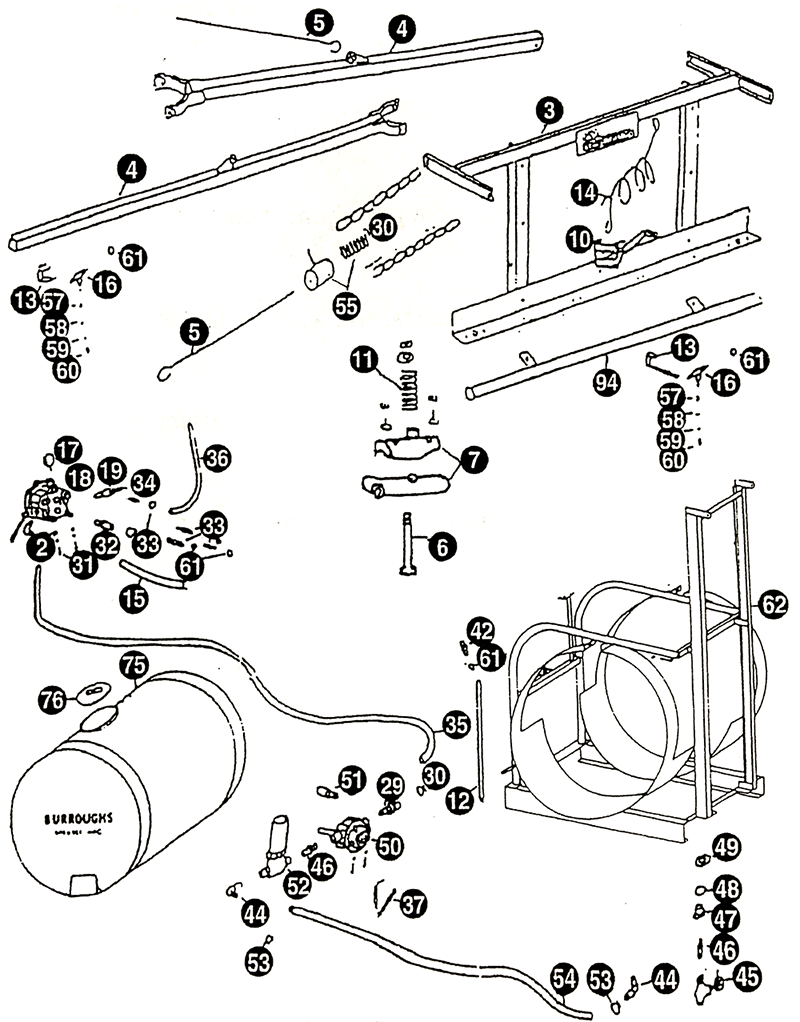 |
No. 2: 3/4" x 3/4" E11 Adapter Nylon No. 3: Cross Section No. 4: Left or Right Spray Booms No. 5: Hook for Boom No. 6: Bolt No. 7: Casting Boom Hinges No. 10: Hand Winch No. 11: Boom Spring No. 12: Adj. Pipe - For Mixer No. 13: QJ-111-1-1/2 Sq Brackets No. 14: Cable No. 15: 3/8" I.D. Rubber Hose No. 16: QJ 3/8 Nylon Nozzles-Single Double No. 17: Pressure Gauge No. 18: AA 17-L Control No. 19: 8460- 3/4 Nylon Relief Valve No. 29: 3/4" x 3/4" Nylon Adapter No. 30: #12 Hose Clamp No. 31: 5/16" x 1" Bolt and Nut No. 32: 3/4" x 3/8" Adapter No. 33: 3/4" x 3/8" Adapter No. 34: 3/4" x 3/4" Adapter No. 35: 3/4" Hose I.D. No. 36: 3/4" Clear Hose I.D. No. 37: Chain No. 42: Rigid Female NPT 1/4" x 3/8" No. 44: 3/4" X 1" ELL Adapter No. 45: 1" Banjo Cut Off Valve No. 46: 1" X 1-1/14" Reduce Nipple No. 47: 1-1/4" Tank Fitting No. 48: Gasket No. 49: Nut No. 50: C7560 Hydro Pump No. 51: Standard Pump Adapter No. 52: 3/4" Line Strainer No. 53: #16 Hose Clamp No. 54: 1" Hose I.D. No. 55: Spring With Chain and Metal Holder No. 57: Slotted Strainer No. 58: No. 25 Core No. 59: D-3 Disc No. 60: QJ Cap & Gasket No. 61: 6203 Hose Clamp No. 62: 110 Gallon Frame No. 75: 110 Gallon Tank No. 76: 10" Lid No. 94: 5th Middle Row |
Setup/Installation
- Mount sprayer to Tractor Hitching Device with retainers to prevent accidental unhitching.
- Refer to Chart of Formulas to determine Gallons Per Acre for your requirement and Tractor Speed and R.P.M. (Example: spring clear water, nozzle spacing 20″ apart, 8004 tips, 4 M.P.H., 30 PSI will spray 26 gallons per acre.)
- Fill tank half-full with clean water strained through a 100 mesh screen, most well water contains sand and water from lakes, rivers, or ditches will most always contain some sand and debris.
- Be sure cut-off valve is open under tank.
- Install pump properly on the PTO shaft with chains and safety guard shields in place.
- Turn T-Handle on Pressure Relief Valve counter-clockwise 5 or 6 times in order to set desired pressure before starting pump.
- Start tractor and set RPM at speed you have determined for tractor speed for spraying.
- Turn Tee Valve Handle to selected setting of Booms. Lever is raised for spraying to start. Lever is lowered for spraying to stop. Raise lever and engage PTO on tractor.
- With Tee Valve lever raised, turn relief valve T-handle clockwise to increase required pressure for Spraying.
- Ask your chemical supplier for the amount(s) of chemical(s) to use per gallon of water, etc.
- Ask your chemical supplier about regulations and requirements of gloves, chemical masks, clothing and other accessories that should be worn or used when using chemicals.
Troubleshooting
This section is a condensed chart to help you if unsatisfactory operation occurs.
- Identify the “Symptom” that best applies
- Check the “Possible Causes”
- Perform the recommended “Remedy”
- If you are unable to determine and correct the trouble, consult your authorized dealer.
Spraying Operation
- Symptom: Pressure gauge won’t read
Possible Causes: Trash in end. Broken gauge.
Remedy: Check gauge. Clean by using air hose or replace as required. - Symptom: Good pressure cut off, no pressure cut on
Possible Causes: Intake hose soft inside. Crimp in hose. Clogged strainer. Trash drawing over outlet fitting inside tank.
Remedy: Replace hose. Clean or replace strainer. Clean out tank, check outlet hole for trash. Clean fittings. - Symptom: Spraying stops
Possible Causes: Trash drawing over outlet fitting inside tank.
Remedy: Clean out tank, check outlet hole for trash, clean. - Symptom: Pumps good water but no pressure
Possible Causes: Defective relief valve spring. Defective pressure gauge. Defective agitator in tank.
Remedy: Replace relief valve spring kit or relief valve. Replace gauge. Replace agitator. - Symptom: Pressure doesn’t change
Possible Causes: Defective relief valve. Defective pressure gauge.
Remedy: Replace spring kit or relief valve. Replace pressure gauge. - Symptom: No pressure
Possible Causes: Defective relief valve. Defective pressure gauge. Defective agitator in tank. Defective pump.
Remedy: Repair or replace relief valve. Replace pressure gauge. Replace agitator in tank. Repair or replace pump. - Symptom: Booms sprays when cut off
Possible Causes: Damaged control valve inside. Trash inside control.
Remedy: Repair or replace control valve. Clean out trash. - Symptom: Water coming out of pump end of shaft end
Possible Causes: Defective seals.
Remedy: Replace seals and check bearings and replace if needed. - Symptom: Water leaking at front of Tee Valve Control
Possible Causes: Damaged packing glands.
Remedy: Replace with repair kit or replace Tee Valve. - Symptom: Water leaking at large nut at tank fitting
Possible Causes: Worn O-ring
Remedy: Replace gasket and check tank for cracks. - Symptom: Sprayer has good pressure but won’t spray
Possible Causes: Intake line clogged. Strainer clogged inside tank.
Remedy: Clean hoses, strainer, and/or tank. Lift Tee Valve lever to “on” position.
Warranty
Burroughs Sprayer Mfg. warrants each new Burroughs product to be free from defects in material and workmanship. This warranty is applicable only for the normal service life expectancy of the machine or components to not exceed three consecutive months from the date of delivery of the new Burroughs product to the original purchaser.
Under no circumstance will it cover any merchandise or components thereof which, in the opinion of the company, has been subjected to negligent handling, misuse, alteration, an accident, or if repairs have been made with parts other than those obtainable through Burroughs Spraying Mfg.
The company in no way warrants engines, batteries, tires or other trade accessories since these items are warranted separately by their respective manufacturers.
Our obligation under this warranty shall be limited to repairing or replacing, free of charge to the original purchaser, any part that in our judgement shall show evidence of such defect, provided further that such part shall be returned within thirty (30) days from date of failure to Burroughs Sprayer Mfg. through the dealer and distributor to whom the purchase was made, transportation charges prepaid.
This warranty shall not be interpreted to render us liable for injury or damages of any kind or nature, direct, consequential, or contingent, to person or property. This warranty does not extend to loss of crops, loss because of delay in harvesting, or any expense or loss incurred for labor, supplies, substitute machinery, rental or for any other reason.
THERE ARE NO WARRANTIES, EITHER EXPRESSED OR IMPLIED, OF MERCHANTABILITY OR FITNESS FOR PARTICULAR PURPOSE INTENDED FOR FITNESS OR ANY OTHER REASON.
This warranty is subject to any existing conditions of supply which may directly affect our ability to obtain materials or manufacture replacement parts.
Burroughs Sprayer Mfg. reserves the right to make improvements in design or changes in specifications at any time, without incurring any obligations to owners of units previously sold.
No one is authorized to alter, modify, or enlarge this warranty nor the exclusions, limitations and reservations.